HotspotUV v2.4.0 ← Product page

Trim-sheet UV mapping · 3ds Max

The complete 3ds Max trim sheet workflow

A UV island lands on the perfect trim, in one click. HotspotUV matches every island to the best-fitting trim by shape, area and texel density, then rotates and scales it into place. The whole run is a single Undo step. Built entirely on the standard Unwrap_UVW modifier.

HotspotUV– □ ×
UV map snap →
Sample_TrimSheet.json | 2048 x 2048

The idea

What hotspotting is

A trim sheet is an atlas of rectangles (trims) you "snap" UV islands onto. Instead of fitting every island by hand, you select a batch of islands — and HotspotUV lays them out across the matching trims.

Video series

Trim Sheets in 3ds Max: the full series

Six short episodes, about 25 minutes total: model the sheet from one plane, bake and texture it in Substance Painter, let HotspotUV build the trim sheet from an ID map, then UV entire props in one click. Everything on this page, shown live.

  1. Model the Sheet (primitives only, no sculpting)
    Start from a single plane in the Top view, cut it into bands with Connect, then extrude panel grooves and bevels. No sculpting and no high-poly detour: the sheet is built from primitives, so every trim stays a clean rectangle and the UV work later stays predictable.
  2. Bake and Texture in Substance Painter (the ID map trick)
    Export the low poly, bake the mesh maps with a distance-based cage, then texture with layered smart materials. The trick is the second export: switch the template to Mesh Maps and pull the ID map out as its own file. That ID map is what builds your trim sheet in the next episode.
  3. Your ID Map Builds the Trim Sheet FOR You
    Trims From Texture reads the flat colours of the ID map and detects every trim block on its own: colour tolerance, minimum block size, background ignored. Nine trims lifted straight out of one texture, with no rectangles drawn by hand and no drift between the sheet and the pixels.
  4. UV Map Any Prop in ONE Click
    Add Unwrap_UVW, select the polygons, press Hotspot. Every island is matched to the closest trim by aspect ratio first and area second, straightened with a minimum-area bounding rectangle, then scaled so texel density matches across the whole selection. One undo step covers the entire run.
  5. Thousands of Faces, ZERO Unwrapping: Quick UV + Hotspot
    Quick UV takes an unmapped blockout, breaks every hard edge into its own island and hands the result straight to the hotspot pass. Large modular geometry gets trim sheet UVs without a single seam placed by hand, which is where the time actually goes on environment work.
  6. Quick UV + Hotspot: One Click Per Prop
    The same chain applied prop by prop across a modular kit, with matching priorities and texel density held identical between objects so nothing shifts scale from one piece to the next.

Trim sheets in 3ds Max have always been a manual job: line the island up with the trim, rotate it, scale it, check the density, repeat a few hundred times. The workflow above removes the repetition and leaves the decisions. Everything shown runs on the standard Unwrap_UVW modifier, so the result is a normal 3ds Max scene that any pipeline can open, and it works the same way in 3ds Max 2022 through 2027.

Setup · before you start

Build the trim sheet first

Hotspot needs a sheet of zones. The most reliable route: generate zones from existing UV islands — the trims then match the texture pixel-perfectly. A proven recipe (do it once, then just load the file):

Shortcut (v2.2): New Trimsheet from Texture

If your sheet is a flat-color layout (color-ID), skip the recipe: File → New Trimsheet from Texture… turns every color block into a trim and sets the texture as the map background. The steps below remain the route for photographic trim sheets.

A

Plane + trim texture

Create a Plane and assign a material with your finished trim-sheet texture — visible in the viewport, it will guide the cuts.

B

Cut the trims on the plane

Cut the plane along the trim borders (Edit Poly: Cut / Slice), following the edges visible on the texture.

C

Split into islands in Unwrap_UVW

Add Unwrap_UVW and split the cut faces into separate islands — each trim = one island. The plane's UVs already sit 1:1 on the texture, nothing to lay out.

D

Generate Trims from UVs

Polygon mode, select all islands → click ✦ Generate Trims from UVs in HotspotUV. Zones are created in reading order, numbered Trim 01, 02…

E

Background, metadata, save

Set the texture as the map background (Background → From Selected Object…), add tags / Fit axis / World W-H in Edit Trim and save the .json.

Alternatives — when you don't want to cut geometry:

Draw over the background

Load the texture as the map background, enable Edit + Snap and build zones by hand: New Trim, Duplicate, drag on the map. Zero geometry.

Generate Grid Trims

For regular atlases: an N×M grid from one dialog, then tweak individual zones in Edit mode.

Existing file

Open Trimsheet (.json) loads an existing sheet; Import Trimsheet merges zones from another file into the current one.

Workflow · 5 steps

From selection to a finished atlas

This is the real sequence — order matters.

01

Load a trim sheet

File → Open Trimsheet (.json) — the sheet built with the recipe above. The last used sheet reloads automatically.

02

Prepare the model

Add / pick Unwrap_UVW, enter Polygon mode and select the faces of one or many islands. You can also select several objects at once.

03

Pick target trims

On the map, switch to Select and click / drag-select trims. Nothing selected = all enabled zones.

04

Set the options

In the right panel tune Mapping, Matching and Scale; flip to Advanced for Padding and Variation. Everything saves as you go.

05

Hotspot selected UVs

Hit the big button. Islands snap into trims; one Ctrl+Z reverts everything. A summary line lands in the Listener.

Interface · full function reference

Anatomy of the window

Twelve areas = the complete reference. Click a number on the screenshot or an item in the legend — every area describes all of its controls. Use ‹ › to walk through the whole window.
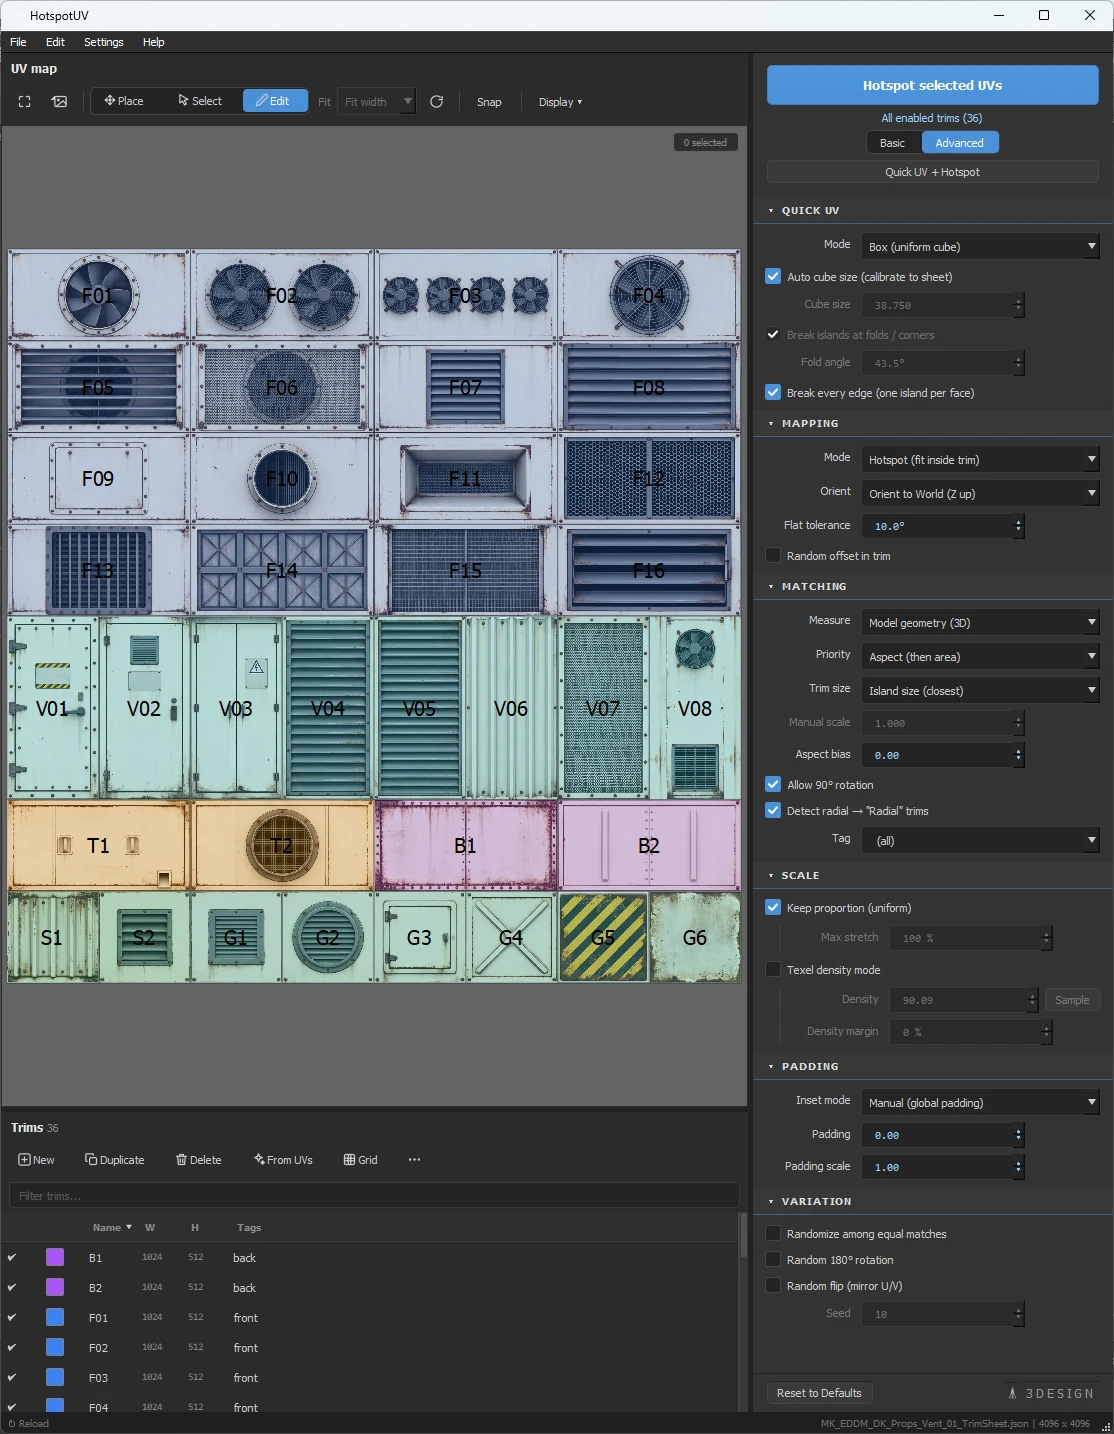
HotspotUV window in 3ds Max, Advanced view

Screenshot from 3ds Max 2024, HotspotUV v2.4 · MK_EDDM props sheet (4096², 36 trims)

Interactive · the matching engine

Why did the island land right there?

A simulator of the engine inside a faithful replica of the tool's UI. Change the island's shape and the Matching settings — trim selection happens live, with the same logic as in Max: nearest aspect first, then nearest area. Read the result like the MAXScript Listener.

HotspotUV — Matching Playground– □ ×
UV map 1 selected
Hotspot selected UVs
1 target trims selected
Island
3.00
mid
Matching

Mapping · modes

One island, three strategies

The Mode option decides how an island sits in a trim.

Hotspot
Fit the whole island inside the matched trim, proportions kept.
Seamless U
Fit height only — the island may overflow the trim horizontally (tiling).
Fill (stretch)
Stretch edge-to-edge to cover the whole trim (per-trim, From trim settings).

Seamless V works like Seamless U with the axes swapped (width fitted, vertical overflow). From trim settings reads each trim's own Fit axis — one pass mixes all three strategies on a single sheet.

Good to know

Concepts & mechanics

Hotspot targets

Zones selected on the map. No selection → all enabled zones.

Position tie-break

On a tie the zone closest to the island's current position wins — a stable round-trip. With Randomize → random.

Texel density

2048 · √(areaUVW / areaGeom) from a reference island, or one click on Sample.

One Undo

The whole hotspot is one step — a single Ctrl+Z reverts every island, multi-object runs included.

Performance

Bulk pipeline: ~1.7 ms per island. 1888 islands → about 3.3 s.

File format

.json — pixels, background, inset, World W/H, fit axis.

Setup requirement

1+ objects, an active Unwrap_UVW, Polygon mode, faces selected — the tool checks this before every run.

Seamless-aware matching

An island longer than a strip along its free axis is a legal match (it tiles anyway) — the tightest strip that accepts it wins.

Ready to map

Put HotspotUV in your 3ds Max

You've seen the workflow and the matching engine. The plugin sits on top of the standard Unwrap_UVW — no pipeline changes, one Undo per run.

Get HotspotUV →